Skin Mechanism Visual
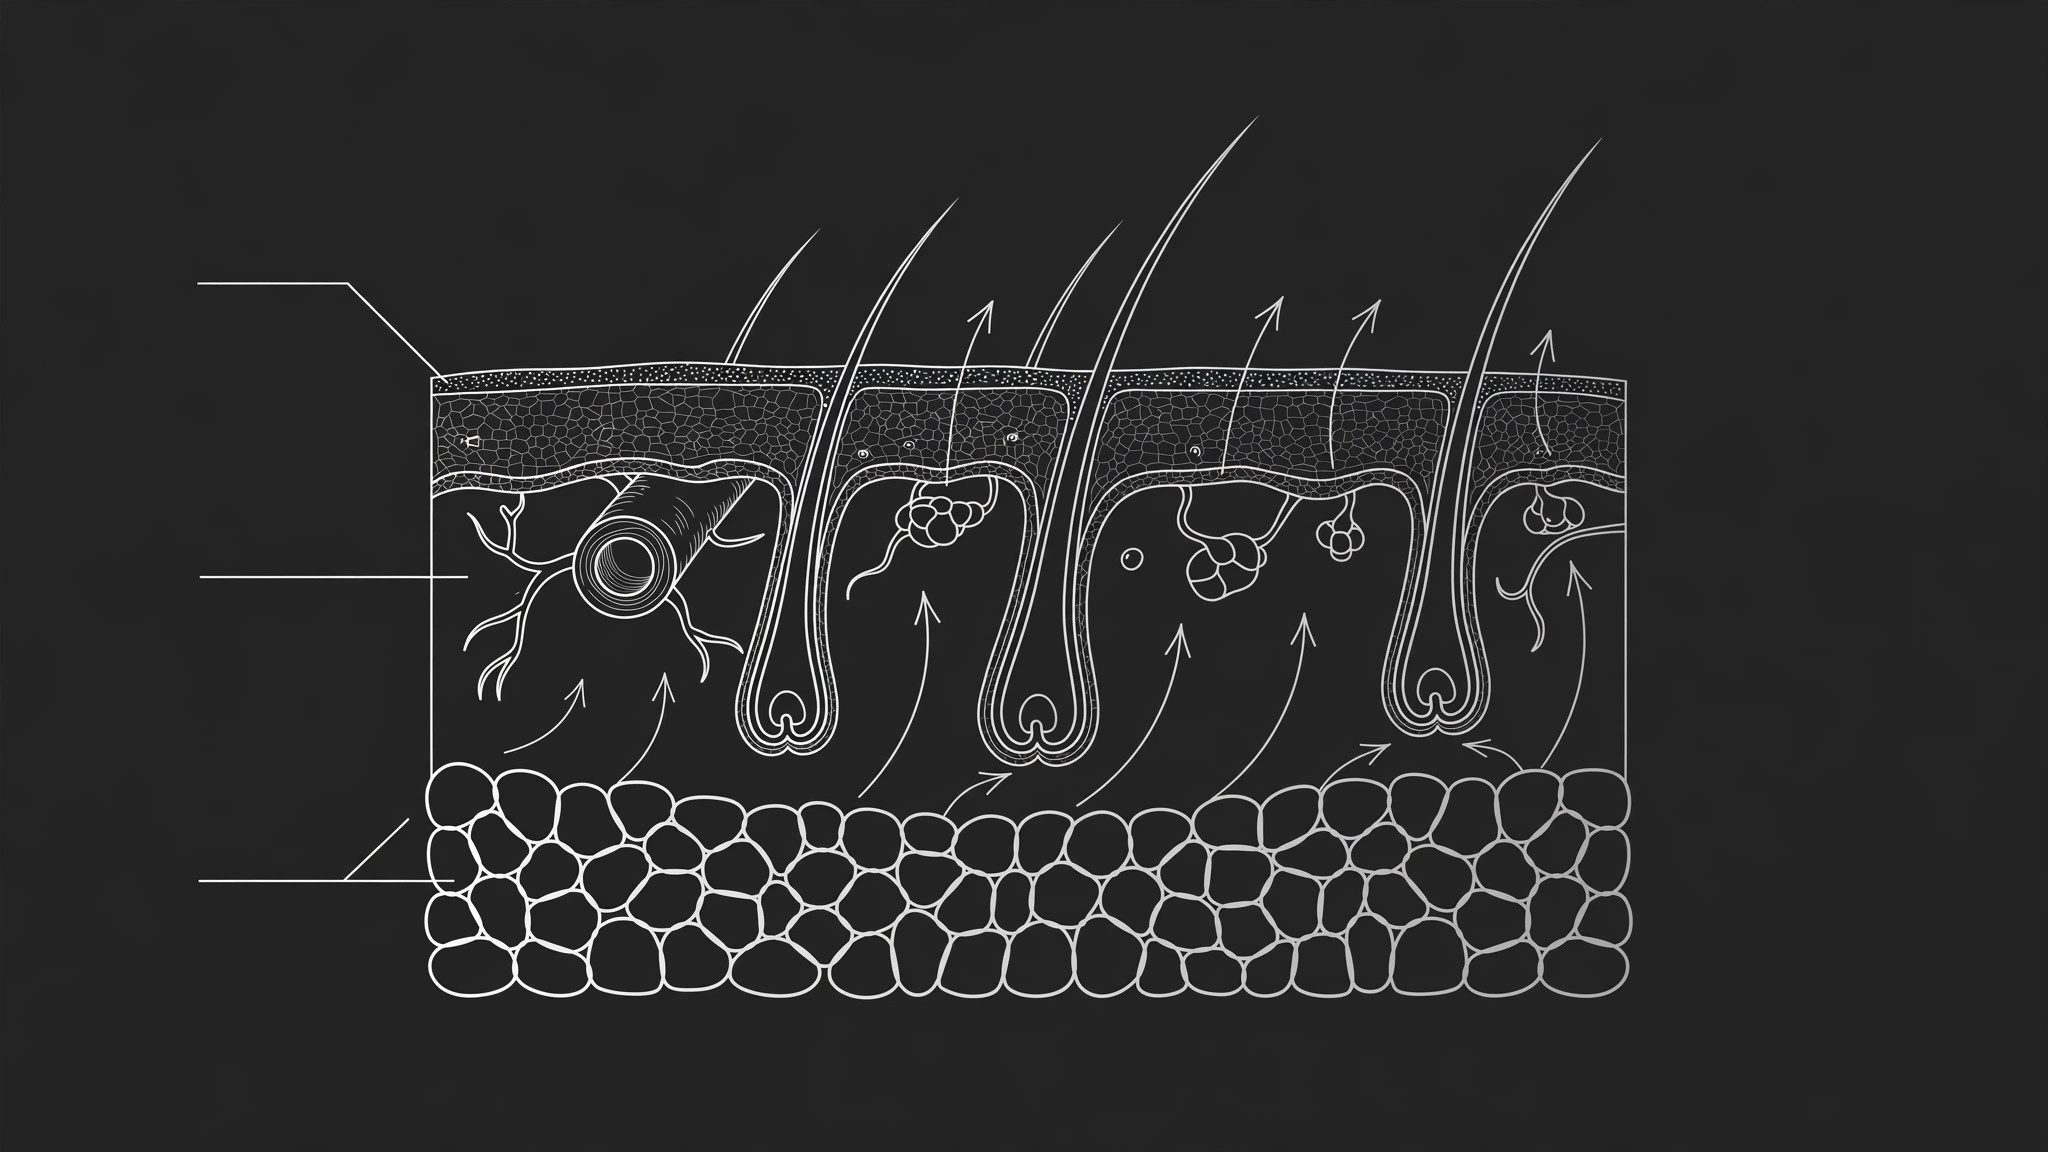
Cómo funciona la piel, mostrada capa por capa.
Convierte tu IA en explicadora visual de la ciencia de la piel: crea un diagrama claro y preciso de cómo se estructura la piel en capas y cómo funciona, con etiquetas en lenguaje claro y una secuencia paso a paso del mecanismo, para contenido educativo, de cuidado de la piel o de salud.
Instálala en 3 pasos
Sin registro. Sin herramientas CLI. Elige tu IA, copia una línea y pégala.
¿Prefieres hacerlo tú mismo? Compra la habilidad ($4.99), descarga el ZIP desde la confirmación de compra, descomprímelo en el directorio que se muestra arriba y reinicia tu sesión de IA — el mismo resultado. ¿Ya la compraste? Tu asistente de IA puede descargarla por ti.
Qué incluye
Un SKILL.md (la guía paso a paso) + una plantilla inicial. Una vista previa:
Skin Mechanism Visual
When to use
- A skincare brand needs to explain what its product does without resorting to vague "deep repair" claims
- A health educator wants a diagram of skin layers for a lesson, handout, or patient leaflet
- A beauty or dermatology blog post needs a visual that shows a process (how skin renews itself, how it keeps water in) instead of just naming parts
- A packaging or poster project needs a clean cross-section of skin that a non-expert can read
- A training deck for salon or clinic staff needs one shared picture of how skin works to anchor the lesson
Workflow
- Define the audience and the one mechanism (input: topic → output: scoped brief)
Pick one mechanism and one audience: "how skin renews itself, for skincare shoppers" beats "everything about skin, for everyone." Write the brief as one sentence — audience, mechanism, and the one thing the reader should understand after looking at the visual. If the brief needs an "and" to finish, it is two visuals; split it now rather than cramming two processes into one diagram. - Map the three layers (input: brief → output: layer map)
Draw skin as a cross-section with its three widely described layers, outermost first: the epidermis, the thin outer layer that forms the barrier and sheds surface cells; the dermis, the thicker middle layer holding collagen and elastin fibres, blood vessels, nerves, sweat glands, and hair follicles; and the hypodermis (also called the subcutis), the deepest layer of fat that insulates and cushions. Keep the proportions honest — the epidermis is thin compared with the dermis — and label each layer once, in plain words, with the technical name in parentheses if your audience needs it. - Show the mechanism in motion (input: layer map → output: process sequence)
A mechanism is a process, not a parts list: show it as a short sequence of 3–5 steps with arrows across or beside the cross-section. For renewal, show new cells forming low in the epidermis, moving upward as they flatten, and shedding from the surface. For moisture, show water held in the outer layer and the barrier slowing its escape. Each step gets one short label and one visual change; if a step has no visible change, it does not belong in the diagram — put it in the caption instead. - Label plainly (input: diagram → output: labeled visual)
Label every structure you draw and nothing you don't. Use plain language first ("outer barrier layer") with technical terms alongside where they help ("epidermis"), and keep labels short — a label is a name, not a paragraph. Put longer explanations in a numbered caption or legend keyed to the diagram, so the picture stays readable and the text stays findable. Never label a structure you are unsure about; an unlabeled shape is a draft problem, a mislabeled one is misinformation. - Check accuracy and tone (input: labeled visual → output: reviewed visual)
Check every claim against a reliable general anatomy or dermatology reference: layer names, what lives in each layer, and the direction of each process step. Strip out any language the diagram cannot support — "repairs", "heals", "reverses", or "detoxifies" need evidence the picture alone will never provide, so leave them out unless a qualified reviewer has approved the exact wording. Have someone outside the project read the visual once: if they can describe the mechanism back to you in their own words, it is ready.
Vista previa de la plantilla
Skin Mechanism Visual — Template
One visual = one mechanism = one audience. Educational only — not medical advice.
Brief (one sentence)
Audience: {who will read this} Mechanism: {the one process to show, e.g. how skin renews itself / how the barrier holds water in} Reader should understand: {the one thing they take away}
Layer map (cross-section, outermost first)
Proportions: {epidermis thin vs. dermis — keep honest} Label style: {plain words first, technical name in parentheses}
Process sequence (3–5 steps, arrows, one label + one visible change each)
- {step} — visual change: {what moves / appears / leaves}
- {step} — visual change: {…}
El paquete de la habilidad (SKILL.md + plantilla) está escrito en inglés.
También te puede interesar
 Otros
Continuity Asset Set
Un kit que hace que cada entregable parezca parte del mismo conjunto.
 Otros
Device-Canvas Product Launch
Un gran lienzo de dispositivo carga con toda tu historia de lanzamiento.
 Otros
Frame-Token Editorial Launch
Un solo conjunto de tokens, todos los materiales, cero desviaciones.